If you learn how to single crochet properly, you have the stitch everything else in crochet is measured against.
Single crochet is the second of the 7 crochet stitches every beginner should know, and the one most beginner projects are actually built from.
It’s short, it’s dense, and it makes a fabric with almost no gaps — which is why it’s used for amigurumi, baskets, bags, dishcloths, and anything that needs to hold its shape. If you learn one stitch properly, learn this one.
It’s also the stitch where beginners hit their first real wall. Not the stitch itself, which takes about ten minutes. The wall is that your rectangle stops being a rectangle. Row one has 20 stitches, row eight has 24, and nobody told you why.
That problem has a specific cause and a specific fix, and it’s covered in full below.
A note on US and UK terms first
This matters before anything else, because getting it wrong means making an entirely different stitch.
US single crochet is the same stitch as UK double crochet. Same movements, same result, different name.
The two systems overlap in a genuinely unhelpful way — “double crochet” exists in both, and means two different things. A UK pattern saying “dc” wants the stitch in this guide. A US pattern saying “dc” wants a much taller stitch.
Everything here uses US terminology, which is what most online patterns and most of YouTube use. If a pattern doesn’t state which system it uses, check whether it mentions “single crochet” anywhere — if it does, it’s US.
Before you start
You need to be able to make a chain. Single crochet is worked into something, and that something is usually a foundation chain. If you’re not confident there yet, start with the chain stitch tutorial and come back.
You’ll want:
- A 5.0mm or 5.5mm hook
- Smooth worsted weight yarn in a light, solid colour
- A stitch marker, or a scrap of contrasting yarn that will do the same job
That last one isn’t optional advice dressed up as a suggestion. It’s the difference between this going well and going badly, for reasons that’ll be obvious shortly.
Understanding the top of a stitch
Before you work a single stitch, look at what you’ll be working into.
Every crochet stitch has a V across the top — two loops lying side by side, forming a small chevron. The loop nearer to you is the front loop. The one behind it is the back loop.
Unless a pattern tells you otherwise, you insert your hook under both loops, from front to back. That’s the default for everything, and it’s what this guide assumes.
Being able to see that V clearly is most of the battle in early crochet. It’s also exactly why light, solid, smooth yarn matters so much when you’re learning — in dark or fuzzy yarn the V disappears and you end up guessing.
How to single crochet: step by step
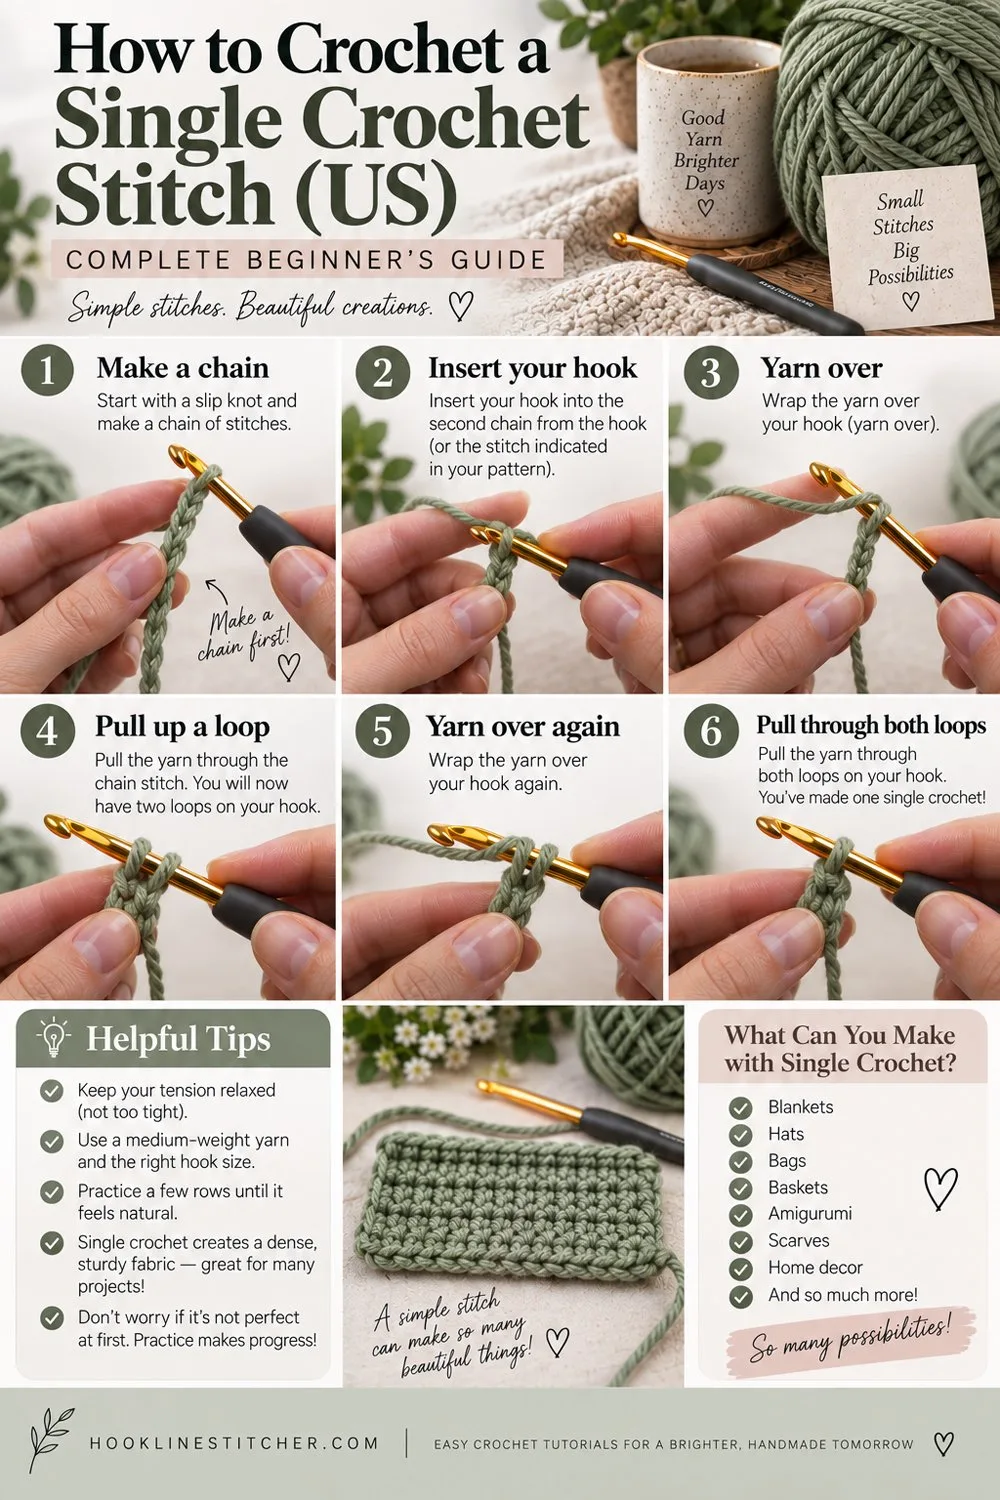
Make a slip knot and chain 21.
Twenty-one, not twenty. Twenty stitches plus one — the extra chain gives your first stitch its height. This is standard and every pattern assumes it.
Row 1
Step 1 — Insert your hook into the second chain from the hook. Not the first. The chain right beside your hook is the one that provides height, so you skip it. Count carefully: the loop on your hook doesn’t count, the first V below it is chain one, the next V is chain two. That second one is your target.
Step 2 — Yarn over. Bring the working yarn over the hook from back to front.
Step 3 — Pull up a loop. Draw the hook back through the chain, bringing that yarn with it. You now have two loops on your hook. Pause here and check — two loops. This is the halfway point of the stitch and the moment worth memorising.
Step 4 — Yarn over again.
Step 5 — Pull through both loops on the hook. One smooth movement, both loops at once. You’re left with one loop on the hook.
That’s one single crochet.
Step 6 — Repeat across. One single crochet into each remaining chain, all the way to the end. When you finish, count. You should have 20 stitches.
If you have 19 or 21, don’t push on. Pull it out and redo it. Learning to count now is much cheaper than discovering a problem eight rows later.
Turning and Row 2
Step 1 — Chain 1. This is your turning chain. It brings the yarn up to the height of the next row.
Important: for single crochet, the turning chain does not count as a stitch. It’s just height. Different from taller stitches, where the turning chain often does count — and a frequent source of confusion when people move on from single crochet.
Step 2 — Turn your work. Flip it over like a page, so the other side faces you. Direction doesn’t matter much, but pick one and always turn the same way — it keeps your edges consistent.
Step 3 — Work your first single crochet into the very first stitch. The first stitch, not the second. This is where the trouble starts, so the next section deals with it properly.
Step 4 — Single crochet into each stitch across.
Step 5 — Count. Twenty again.
Repeat rows 2 onward until you’re bored. Ten rows is enough to know whether it’s working.
The edge problem: why your rows widen or narrow
This is the single most common beginner crochet failure, and it’s worth understanding rather than just avoiding.
Rows getting wider means you’re adding a stitch each row. Almost always because you’re working an extra stitch into the turning chain at the end of the row. That chain-1 isn’t a stitch, but it sits there looking like one, and it’s easy to hook into by accident.
Rows getting narrower means you’re losing a stitch. Usually the first stitch of the row — after turning, the first stitch sits directly under the loop on your hook and is easy to skip without noticing. Occasionally it’s the last stitch, missed because the end of a row looks ambiguous.
Both problems come from the same root: the first and last stitches of a row are the hardest to identify, and single crochet is short enough that mistakes there are hard to see until they’ve compounded.
The fix, and it works every time:
Put a stitch marker in the first stitch of every row, right after you make it. Move it up each row. Now you always know exactly where the row begins, and the last stitch of the next row is simply the one containing the marker.
Also: count your stitches at the end of every row for your first few projects. It feels tedious. It takes eight seconds. It saves projects.
Most crocheters stop needing markers after a few weeks, because the shape of the row becomes readable. Until then, use them.
Getting the fabric right when you single crochet
Single crochet makes dense fabric. That’s its purpose — it’s why amigurumi is worked in single crochet, because stuffing shouldn’t show through.
If your fabric is stiff like cardboard, your tension is too tight. This is the usual beginner problem. Loosen your grip on the hook, and if that isn’t enough, go up a hook size.
If it’s floppy with visible gaps, tension is too loose — go down a size, or add a wrap around your pinky to increase resistance.
If the edges curl, that’s normal for single crochet in the first few rows and usually settles as the piece grows. Persistent curling means tension is too tight.
A well-worked single crochet fabric should be firm but bendable, with no daylight through it and no stiffness.
How to single crochet in the round
Same stitch, no turning. Worth a quick mention since it’s where a lot of beginners head next.
Two approaches:
Spiral — you never join, you just keep going round and round. Used for amigurumi. Produces a seamless surface, but you absolutely need a marker in the first stitch of each round, because there’s no visual seam to tell you where the round started.
Joined rounds — you slip stitch into the first stitch to close each round, then chain 1 and start the next. Leaves a visible seam line, but it’s much easier to keep track of.
Beginners generally find joined rounds easier to count and spirals easier to finish neatly. Try both when you get there.
Common mistakes
Working into the first chain instead of the second. Costs you your height and pulls the corner tight. Skip one, always.
Pulling through both loops separately. The final step is one motion through both loops together. Doing them one at a time makes a different, taller stitch.
Losing count. Markers and end-of-row counting. There’s no clever alternative.
Working into the turning chain. The chain-1 in single crochet is never a stitch. Ignore it.
Splitting the yarn. If your hook goes through the middle of a strand rather than under it, the stitch looks fuzzy and sits wrong. Usually a sign of a sharp hook point, loosely spun yarn, or rushing. Slow down and aim under the whole V.
Starting with the wrong yarn. Fluffy, dark, or slippery yarn makes it far harder to see the V you’re working into. It’s not you.
What to make once you know how to single crochet
Once ten rows look consistent, make something. Learning a stitch and never applying it is how it gets forgotten.
A simple cotton dishcloth is the standard first single crochet project, and for good reason — it’s small, it’s flat, it’s finished in an evening, and it’s genuinely useful afterwards. Chain 31, single crochet across, repeat until square.
The gap between “I can do this stitch” and “I made a thing” is where crochet actually becomes a hobby rather than an exercise.
What’s next
Single crochet is short, which means it takes a lot of rows to build anything large. The natural next stitch is half double crochet — a bit taller, works up faster, and softer in drape while still being dense enough for most projects.
After that, double crochet, and at that point you can make almost anything a beginner pattern asks for.
Projects that use single crochet
- Crochet bookmark — single crochet in rows, about twenty minutes
- Crochet coaster — single crochet worked in a flat circle
- Crochet mini bag — a flat circle base worked up into sides
- Crochet cat amigurumi — single crochet in a continuous spiral
- Crochet turtle amigurumi — two flat circles sewn together
Frequently asked questions
Is US single crochet the same as UK double crochet?
Yes. Identical stitch, different name. UK “double crochet” and US “single crochet” both mean the stitch in this guide.
Does the turning chain count as a stitch in single crochet?
No. The chain-1 at the start of a single crochet row provides height only. Working into it at the end of the next row is the most common cause of rows getting wider.
Why are my single crochet rows getting wider?
You’re adding a stitch each row, almost always by working into the turning chain. Mark your first stitch each row and count at the end of every row.
Why does my single crochet curl?
Mild curling in early rows is normal. If it persists, your tension is too tight — loosen your grip or go up a hook size.
Which chain do I start in?
The second chain from the hook. The first one gives your row its height and is skipped.
How many loops should be on my hook mid-stitch?
Two. After you pull up a loop you should have two loops on the hook, then you yarn over and pull through both at once.
Is single crochet good for blankets?
It makes a lovely dense blanket, but it’s slow — the stitch is short, so a blanket takes a lot of rows and a lot of yarn. Most blanket patterns use taller stitches for that reason.
Cathrinee’s Supply Kit
The beginner basics I recommend
How do you crochet a single crochet stitch?
Insert the hook into the next stitch, yarn over and pull up a loop so you have two loops on the hook, then yarn over and pull through both loops. That is one single crochet.
What is the turning chain for single crochet?
Chain 1, and it does not count as a stitch. Work your first single crochet into the very first stitch of the row, not the second. Skipping it is the most common cause of narrowing rows.
What is single crochet used for?
Anything that needs a dense, sturdy fabric — amigurumi, baskets, bags, potholders, dishcloths and slippers. It is the shortest basic stitch, so it produces the tightest fabric of the common stitches.
Why is my single crochet curling?
Single crochet curls more than any other stitch because it is short and dense. Going up one hook size usually solves it, and a border of two or three rounds will flatten the finished piece.
Is single crochet the same in UK and US terms?
No. US single crochet is called double crochet in UK terms. Most online patterns use US terms, so check which system a pattern uses before you start — the names shift by one place between the two.


4 Comments on “How to Crochet a Single Crochet Stitch (US) — Complete Beginner’s Guide”