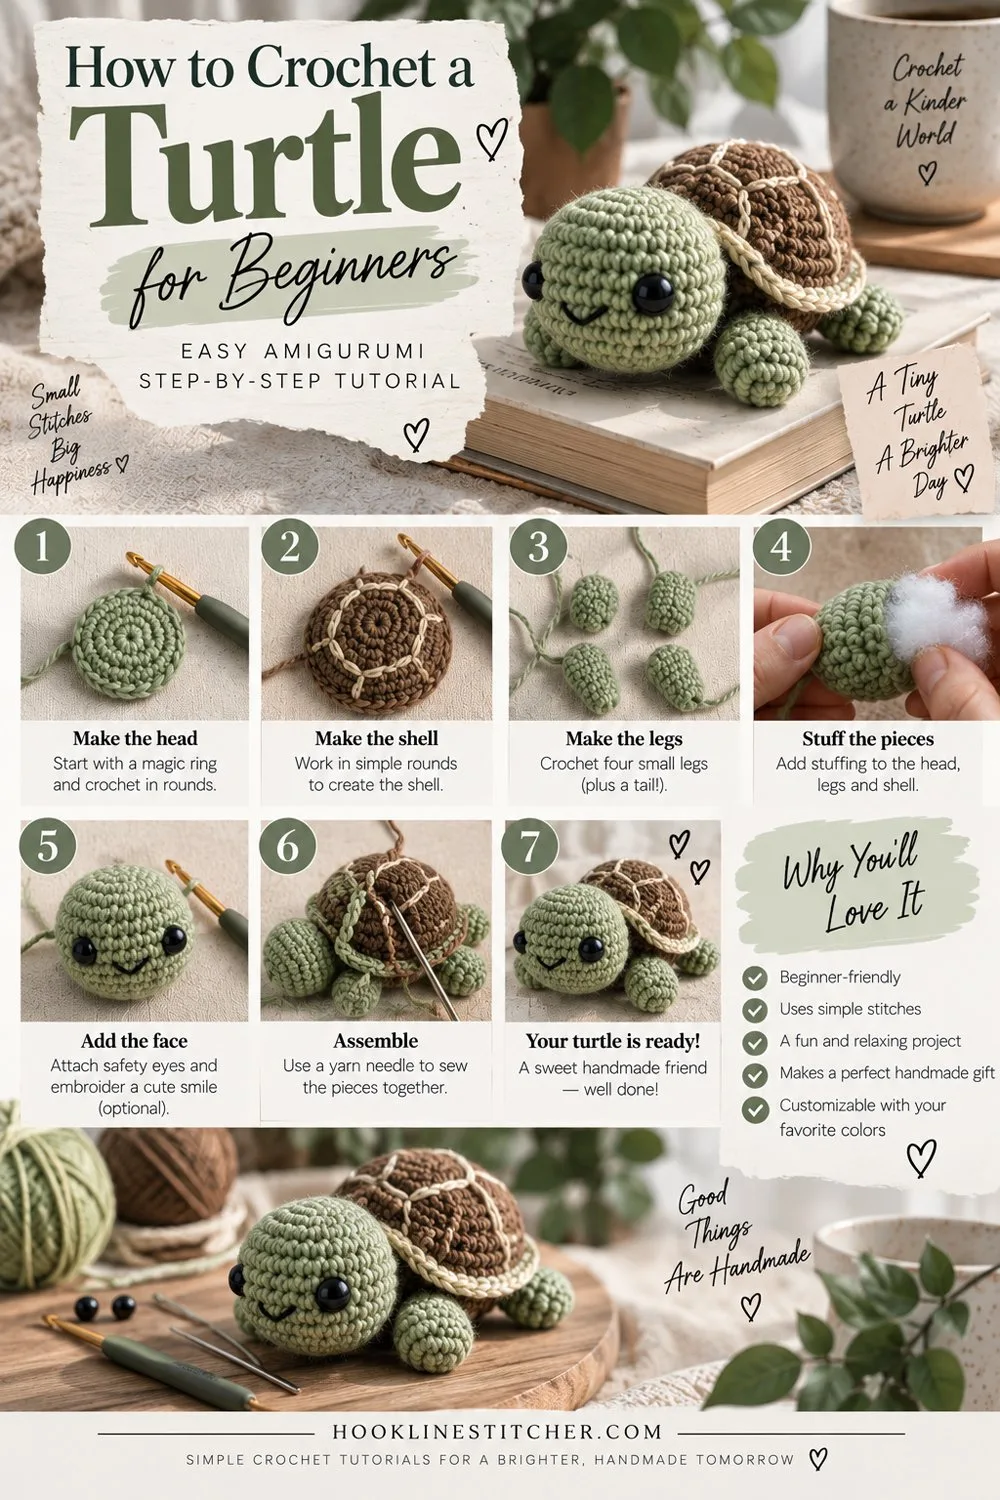
A turtle is the best first amigurumi, and almost nobody says so. Here is how to crochet a turtle from a few simple pieces, with the shell doing most of the work.
- Skill level: Beginner amigurumi
- Time: About 90 minutes
- Yarn: Worsted (4) or DK (3) in two colours
- Hook: 3.5mm for worsted, 3.0mm for DK
- Finished size: About 12 cm long
- Terms: US crochet terms
The reason is that a turtle body is two flat circles. Make a circle, make another circle, sew them together with stuffing in between. There is no sphere, no neck, no decrease rounds that have to line up with increase rounds. If you can make a coaster, you can make the main body of this turtle.
The head, legs and tail are small and simple, and because a turtle is a lumpy creature by design, slight irregularity looks right rather than wrong. A wonky bear looks like a mistake. A wonky turtle looks like a turtle.
About ninety minutes. Finished turtle roughly 12 cm long.

From the shop · New pattern
A sweet cat-ear coaster in just 5 rounds. Beginner friendly, printable 7-page PDF for $4.99.
See the pattern →What you need to know first
- Single crochet
- The magic ring
- Working in a continuous spiral
- Increasing and decreasing
- Back loop only — used once, to create the shell rim
What you need
Worsted weight (4) or DK (3) yarn in two colours — one for the shell, one for the body, head and legs. Green and cream is the classic combination. Brown and green also works.
A hook one or two sizes smaller than the label recommends. 3.5mm for worsted, 3.0mm for DK. Tight fabric, no visible stuffing.
Polyester toy stuffing.
A stitch marker, a tapestry needle, and black yarn or floss for the eyes.
Safety note: for a child under three, embroider the eyes rather than using safety eyes or beads.
From the shop · New pattern
A sweet cat-ear coaster in just 5 rounds. Beginner friendly, printable 7-page PDF for $4.99.
See the pattern →Cathrinee’s Supply Kit
Everything you need for this project
Terms
US crochet terms.
- MR = magic ring
- sc = single crochet
- inc = 2 sc into the same stitch
- dec = decrease
- BLO = back loop only
- ( ) x6 = repeat the bracket six times
Use the invisible decrease where the pattern calls for dec — front loops only of the next two stitches, then yarn over through two, yarn over through two.
About the shell
Both the shell and the underside are flat circles, which follow one rule: each round adds the same number of stitches as round 1 contains. Round 1 has 6, so every round adds 6 — 6, 12, 18, 24, 30.
Too many and it ruffles. Too few and it cups. If your shell comes out wavy or bowl-shaped, that rule is where to look.
The one deliberate exception is round 6 of the shell, which is worked in back loops only. That creates a visible rim and makes the shell sit slightly domed over the body rather than flat against it.
How to crochet a turtle, piece by piece
Shell
In your shell colour:
- R1: 6 sc in MR — (6)
- R2: inc in each st — (12)
- R3: (sc, inc) x6 — (18)
- R4: (2 sc, inc) x6 — (24)
- R5: (3 sc, inc) x6 — (30)
- R6: sc BLO in each st around — (30)
- R7–R8: sc in each st around — (30)
Fasten off, leaving a long tail for sewing.
Underside
In your body colour:
- R1: 6 sc in MR — (6)
- R2: inc in each st — (12)
- R3: (sc, inc) x6 — (18)
- R4: (2 sc, inc) x6 — (24)
- R5: (3 sc, inc) x6 — (30)
- R6–R7: sc in each st around — (30)
Fasten off, leaving a short tail. Weave it in.
Head
In your body colour:
- R1: 6 sc in MR — (6)
- R2: inc in each st — (12)
- R3–R7: sc in each st around — (12)
- R8: dec x6 — (6)
Stuff firmly before closing. Fasten off with a long tail, run it through the remaining 6 stitches, and pull closed.
Legs (make 4)
In your body colour:
- R1: 6 sc in MR — (6)
- R2–R4: sc in each st around — (6)
Fasten off with a long tail. Stuff very lightly, or leave unstuffed and flatten — flattened legs sit better against the shell.
Tail
- R1: 5 sc in MR — (5)
- R2–R3: sc in each st around — (5)
Fasten off with a tail for sewing.
Assembly
This is the part where a turtle is much kinder than most amigurumi, because everything is sandwiched between two circles and small errors vanish.
Step 1 — Lay the underside flat, right side down.
Step 2 — Position the head, four legs and tail around the edge of the underside, pointing outward. Head at one end, tail opposite, two legs on each side. Pin or hold them and look at the arrangement before you sew anything. Legs set slightly forward of centre look better than legs at the exact sides.
Step 3 — Sew each piece to the edge of the underside, going back and forth several times through the base of each limb.
Step 4 — Place the shell on top, matching the edges to the underside. Both are 30 stitches, so they should line up.
Step 5 — Sew the shell to the underside around the outside edge, working through both layers and catching the limbs where they sit between. Leave a gap of about 8 stitches.
Step 6 — Stuff through the gap. Not too firmly — a turtle should be slightly plump, not rigid. Push stuffing out toward the edges so the shell domes evenly.
Step 7 — Sew the gap closed. Weave in the ends.
Face. Eyes on the head, about 4 stitches apart, roughly two rounds back from the closed tip. A few small stitches each. A tiny smile below is optional and reliably charming.
Troubleshooting
The shell ruffles at the edge. Too many increases. Count round 5 — it should be exactly 30.
The shell cups into a bowl. Too few increases, or tension too tight. Check the counts first.
Shell and underside do not line up. One of them has the wrong stitch count. Both must end on 30.
The turtle is flat and sad. Under-stuffed. Add more, pushing it toward the edges.
The legs stick out at odd angles. Sew along the whole flattened base of each leg, not just one point. A single anchor point lets the leg swivel.
My circle is turning into a hexagon. Your increases are stacking in the same positions each round. Shift where they fall.
Stuffing shows through. Gauge too loose. Smaller hook, start again.
Variations
- Striped shell. Change colour every round or two on the shell. Easy and very effective.
- Patterned shell. Embroider hexagons or simple lines onto the finished shell with a contrasting yarn.
- Bigger turtle. Add round 6 to both circles — (4 sc, inc) x6 for 36 — and work the shell rounds on 36. Chunky yarn with a 5.0mm hook also doubles the size with no changes at all.
- Tiny turtle. Stop both circles at round 4 (24 stitches) and shorten the legs to two rounds.
- Turtle keyring. Make the tiny version and attach a split ring to the back of the shell.
What is next
The circle-plus-limbs construction also gives you a ladybird, a crab, and a tortoise with almost no changes.
If you want to move on to the classic amigurumi sphere shape, a crochet cat is the natural next step — same stitches, but the head and body are worked as one continuous rounded piece.
Frequently asked questions
Is a turtle a good first amigurumi? It is one of the best. The body is two flat circles rather than a sphere, so there is no complex shaping, and a turtle natural lumpiness forgives small irregularities.
How long does it take to crochet a turtle? Around ninety minutes for a first attempt, including assembly.
How many stitches should each round of the shell have? 6, 12, 18, 24, 30 — each round adds 6. That is the flat circle rule for single crochet.
Why is my turtle shell ruffling? Too many increases for the round. Count at the end of every round against the pattern.
What hook should I use for amigurumi turtles? One or two sizes below the yarn label — 3.5mm for worsted, 3.0mm for DK — so stuffing does not show through.
How firmly should I stuff a crochet turtle? Less firmly than a spherical amigurumi. Plump but still soft, with the stuffing pushed toward the edges so the shell domes.
Can I make this without safety eyes? Yes, and you should for any toy going to a young child. Embroidered eyes are safer and look just as good.
You are welcome to sell items you make from this pattern. Please do not republish the pattern text — link to this page instead. Pattern © The Hook Line Stitcher.
How do you crochet a turtle?
Work a domed shell as a flat circle that stops increasing and curves under, then a flat base, a head, four flippers and a small tail. Stuff the shell, sew the base on, then attach the limbs around the edge.
Is a crochet turtle good for beginners?
Yes. The shell is just a circle that stops increasing, the limbs are tiny tubes, and the head is a small ball. There is no complicated shaping, and a turtle tolerates slight irregularity well.
What hook and yarn for a crochet turtle?
Worsted weight yarn with a 3.5 mm hook. Green for the shell and a lighter shade for the body is the classic combination, but any two contrasting colours work.
How do I make the turtle shell look textured?
Work the shell rounds in back loop only to create raised ridges, or add surface slip stitches in a contrasting colour across the finished dome to suggest shell segments.
Is a crochet turtle safe for a baby?
Yes if you embroider the eyes in black yarn rather than using safety eyes, sew every limb on twice, and use machine washable yarn and stuffing.



One comment on “How to Crochet a Turtle for Beginners: Easy Amigurumi Step-by-Step Tutorial”