The chain stitch is the first thing anyone learns in crochet, and it’s the one people are most likely to learn slightly wrong. This guide covers how to crochet a chain stitch properly, including the two mistakes that cause most beginner problems later.
The chain is the first of the 7 crochet stitches every beginner should know — the short list of stitches that between them cover most beginner patterns.
Not wrong enough to notice straight away. Wrong in the way where your first row is a struggle to work into, your blanket edge comes out ragged, and you spend a month assuming that’s just how crochet looks when you’re new.
It isn’t. Most of it comes down to two things nobody explains properly: how tight to make your chains, and which part of the chain you’re supposed to hook into afterwards. This guide covers both.
Before You Start
You need three things sorted:
- A hook and yarn you can see. A 5.0 mm or 5.5 mm hook and smooth worsted weight yarn in a light colour. Dark yarn hides the stitch structure, and you need to see the structure to learn it.
- A comfortable grip. If your hand is already aching, that’s worth fixing before you build a habit on top of it — see how to hold a crochet hook and yarn.
- A slip knot on your hook, snug but sliding freely.
That’s the whole setup. Chains need nothing else.
What a Chain Stitch Actually Is
A chain stitch is a loop of yarn pulled through another loop. That’s it. Repeat it and you get a chain — a flexible cord of interlocking loops that forms the foundation nearly every crochet project starts from.
Chains do three jobs:
- Foundation chains — the starting row you build your stitches on.
- Turning chains — the small stack of chains at the start of a row that brings your yarn up to the height of the stitch you’re about to work.
- Spaces — in lace, granny squares and mesh, chains create deliberate gaps between clusters of stitches.
So this one stitch shows up everywhere. Worth ten minutes to get right.
The Anatomy of a Chain
Lay a length of chain flat and look at it closely. This is the part most tutorials skip, and it’s the part that saves you later.
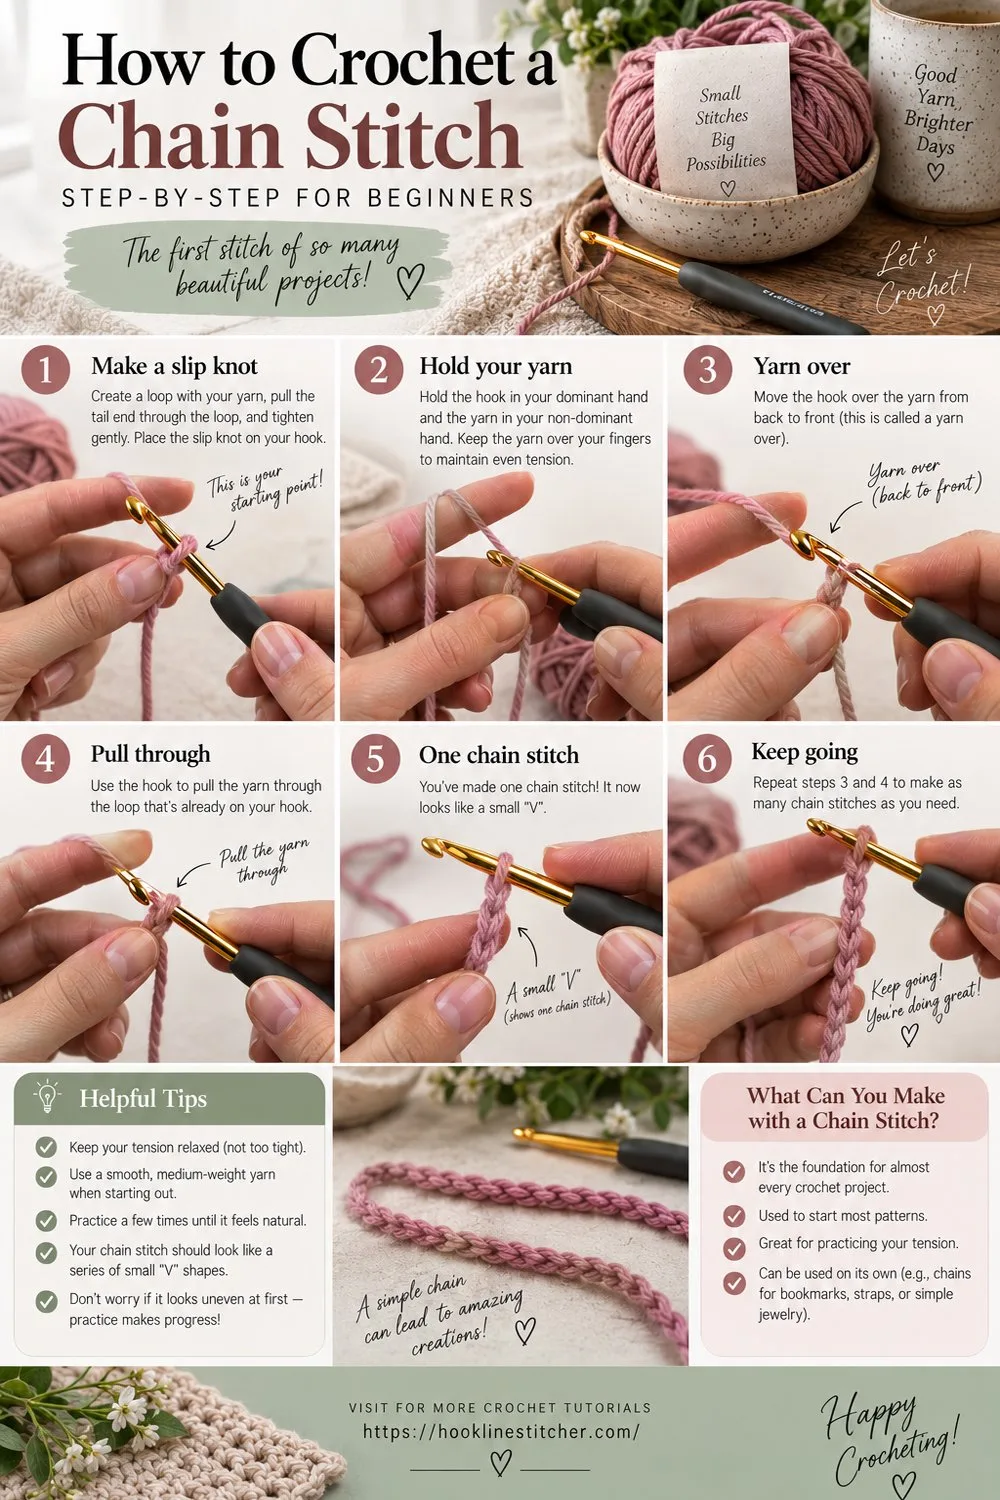
On the front, each chain looks like a small V, or a heart lying on its side. The two legs of that V are the top loop and the bottom loop.
Turn it over. Along the back runs a raised ridge — a single horizontal bump behind each V. That’s called the back bump, or sometimes the third loop.
Three separate parts to every chain: top loop, bottom loop, back bump. Which one you hook into for your first row changes how the finished edge looks — more on that below.
How to Crochet a Chain Stitch: Step by Step
Step 1 — Start with the slip knot on your hook
One loop, snug against the shaft, able to slide.
Step 2 — Yarn over
Bring the working yarn — the strand running to the ball — over the hook from back to front. The hook’s mouth should be facing you so it can catch the yarn. Some hooks have a deep throat, some shallow; either way the yarn should sit in the groove, not balanced on the tip.
Step 3 — Pull the yarn through the loop
Rotate the hook slightly downward so the hooked part faces the loop, then draw it through. That small rotation is the trick — if you try to drag the hook through face-up, it snags on the loop every time. Beginners fight this for days without realising the fix is a quarter turn of the wrist.
Step 4 — You’ve made one chain
There’s now one loop on your hook again, and one completed chain sitting below it.
Step 5 — Repeat
Yarn over, rotate, pull through. Yarn over, rotate, pull through.
Step 6 — Move your grip as you go
Every three or four chains, shift the pinch of your non-dominant hand up so you’re holding just below the loop on your hook. If you keep gripping the same spot, the chain starts twisting and your tension drifts. This is a small habit that fixes a surprising number of problems.
Make about twenty and stop.
How to Count Your Chains
This is where most beginners lose a stitch, and one missing stitch throws off an entire project. Two rules:
- The slip knot is not a chain. It’s the anchor. It’s never counted.
- The loop on your hook is not a chain. It’s a live loop, not a finished stitch. It doesn’t count either.
So: lay your chain flat, front side up. Count the Vs, starting from the one just below your hook and working down toward the slip knot. Stop when you reach the knot. That number is your chain count.
If a pattern says “chain 20,” you want 20 Vs — not counting the knot at the bottom or the loop on your hook.
A practical tip for long chains: place a stitch marker every 20 chains. On a 180-chain blanket foundation, recounting from the start after losing your place is genuinely demoralising, and markers cost nothing.
Getting the Tension Right
Chains are almost always the tightest stitches a beginner makes. There’s a reason for it — with only one loop on the hook and nothing to anchor against, it’s easy to pull each one down hard without noticing. The problem shows up on the next row, when you try to get your hook into a chain that has closed up to nothing.
How tight should a chain be? You should be able to slide the hook back into each chain without forcing it. Test one: work five chains, then try inserting your hook into the third one. If it goes in easily, your tension is fine. If you have to shove, it’s too tight.
The standard fix: work your foundation chain with a hook one size larger than the pattern calls for, then switch to the correct hook for the first row. So a 5.5 mm for the chain, 5.0 mm for everything after. This is not a beginner workaround — experienced crocheters do it routinely, because a slightly loose foundation gives a much better finished edge.
Chains that get looser as you go usually mean your grip has crept toward the end of the chain rather than staying just below the hook. Move your pinch up more often.
Which Loop Do You Work Into?
Your chain is done. Now you need to work your first row into it — and you have three options. Nobody tells beginners this, which is why so many first projects have a messy bottom edge.
Under both loops of the V
The default. Easiest to see, easiest to hook into. Leaves the back bump exposed along the bottom edge, which reads as a slightly bumpy, uneven line.
Under the top loop only
Fastest, and the loosest of the three. It leaves two loops exposed on the edge and produces a stretchy, slightly flimsy foundation. Fine for scarves, not great for anything that needs structure.
Into the back bump
The one worth learning. Turn the chain over and work into the raised ridge on the back. It’s harder to see at first and slower to get used to.
It’s also the one that gives you a clean edge — the front Vs stay intact along the bottom, so your starting edge ends up looking exactly like your finished top edge. On a blanket or a scarf where both edges are visible, the difference is obvious, and it’s one of the fastest ways to make beginner work look finished.
Learn it now while you’re only chaining twenty. It’s much more annoying to relearn later.
Common Chain Stitch Mistakes
- A twisted chain. Before you work your first row, run the chain flat between your fingers and check every V faces the same way. A twist that goes unnoticed becomes a permanent kink through the whole project. On very long chains, check twice.
- Counting the slip knot. Costs you one stitch on every project. Check the counting rules above.
- Chains too tight to work into. Go up a hook size for the foundation, and loosen your grip on the hook itself.
- Yarning over in the wrong direction. The yarn goes over the hook from back to front. Reversed, you get a twisted stitch that sits oddly and won’t match the ones around it. If a chain looks different from its neighbours, this is usually why.
- Chaining while distracted. Chains are repetitive and easy, so it’s tempting to do them while watching something. That’s exactly when you lose count. Chain first, then get comfortable.
Turning Chains: How Many?
Once you’re crocheting rows, you’ll chain at the start of each one to reach the height of the stitch you’re working. The standard heights:
| Stitch | Turning chain |
|---|---|
| Single crochet | Chain 1 |
| Half double crochet | Chain 2 |
| Double crochet | Chain 3 |
| Treble crochet | Chain 4 |
Whether that turning chain counts as a stitch depends on the pattern, and patterns differ. Read the instructions. If it says “ch 3 (counts as first dc),” it’s a stitch. If it just says “ch 3, turn,” it usually isn’t.
Getting this wrong is the most common cause of rows that gradually widen or narrow. Worth being fussy about.
A Quicker Alternative Worth Knowing
There’s a technique called the foundation single crochet — or chainless foundation — where you make the chain and the first row of stitches at the same time.
The advantages are real: the foundation stretches like the rest of your fabric rather than being tighter, and you skip the awkward business of hooking into a tight chain entirely.
Don’t learn it yet. Get comfortable with chains and single crochet first, because the chainless version is built from both. But file it away — the day your foundation chain is too tight for the twentieth time, it’s waiting for you.
What’s Next
You have a chain. Now put stitches into it.
If your hook hand still feels awkward, go back to holding your hook and yarn first — tension problems in a chain almost always start in the grip.
Single crochet is the natural next step — short, sturdy, and the stitch most beginner projects are built from. Once you have chain and single crochet, you can genuinely make things.
Projects that start with a chain
- Crochet bookmark — a flat rectangle worked straight off a starting chain
- Crochet headband — a sideways strip that becomes ribbing
Ready to use your chains in a real project? Start with one of these easy crochet patterns for beginners.
Frequently Asked Questions
Does the slip knot count as a chain stitch?
No. The slip knot anchors your work and is never counted. The loop currently on your hook isn’t counted either. Count only the finished Vs below the hook.
How do I count crochet chains?
Lay the chain flat with the front facing up and count the V shapes, starting just below your hook and moving toward the slip knot. Skip the knot and skip the loop on the hook.
Why is my crochet chain so tight?
Almost always because you’re gripping the hook too hard. Consciously loosen your hand, and work your foundation chain with a hook one size larger than the pattern specifies.
Which loop of the chain should I crochet into?
Working under both loops of the V is easiest for beginners. Working into the back bump on the reverse side takes more practice but gives a much cleaner bottom edge.
Why does my chain twist?
Usually because you’re holding the same spot for too long. Move your grip up every few stitches so you’re always pinching just below the hook.
How long should my foundation chain be?
Whatever the pattern says, plus its turning chains. If you’re freestyling, chain until it’s slightly shorter than your finished width — chains stretch, finished fabric less so.
Cathrinee’s Supply Kit
The beginner basics I recommend
How do you crochet a chain stitch?
Make a slip knot on your hook, yarn over, and pull the yarn through the loop. That is one chain. Repeat for as many chains as you need, keeping them loose and even.
How do I count crochet chains?
Each chain looks like a small V on the front of the work. Count the Vs, and never count the slip knot or the loop currently on your hook. Both are common miscounts that throw off your first row.
Why is my foundation chain too tight?
Most people chain more tightly than they crochet. Use a hook one or two sizes larger for the chain only, then switch back for the first row. A tight chain pulls the whole bottom edge in permanently.
Which loop of the chain do I crochet into?
For a normal foundation, insert the hook under the back bump on the reverse of the chain — it gives the neatest bottom edge. Working under the top two loops is faster but leaves a looser, less tidy edge.
Why does my crochet chain twist?
A plain chain always twists because of how the loops stack. It straightens out as soon as you work the first row into it. If you need a chain to stay flat as a strap or tie, work a row of stitches back along it.


5 Comments on “How to Crochet a Chain Stitch: Step-by-Step for Beginners”