Nobody tells you this part properly.
Most beginner crochet tutorials spend four seconds on how to hold everything and then launch straight into chain stitches. So you copy what you saw, your hand cramps within twenty minutes, your stitches come out uneven, and you assume you’re just bad at crochet. This guide covers how to hold a crochet hook and yarn properly, so your hand stops cramping and your tension evens out.
You’re not. You just haven’t found your grip yet.
Here’s the thing that took me longer than it should have to accept: there is no correct way to hold a crochet hook. There are two common grips, three or four common ways to run the yarn through your fingers, and roughly a million small personal variations. What matters is that your hand doesn’t hurt and your tension stays even. Everything in this guide is aimed at those two things.
What you need before you start
Not much, but the choices do matter more than you’d think for a beginner.
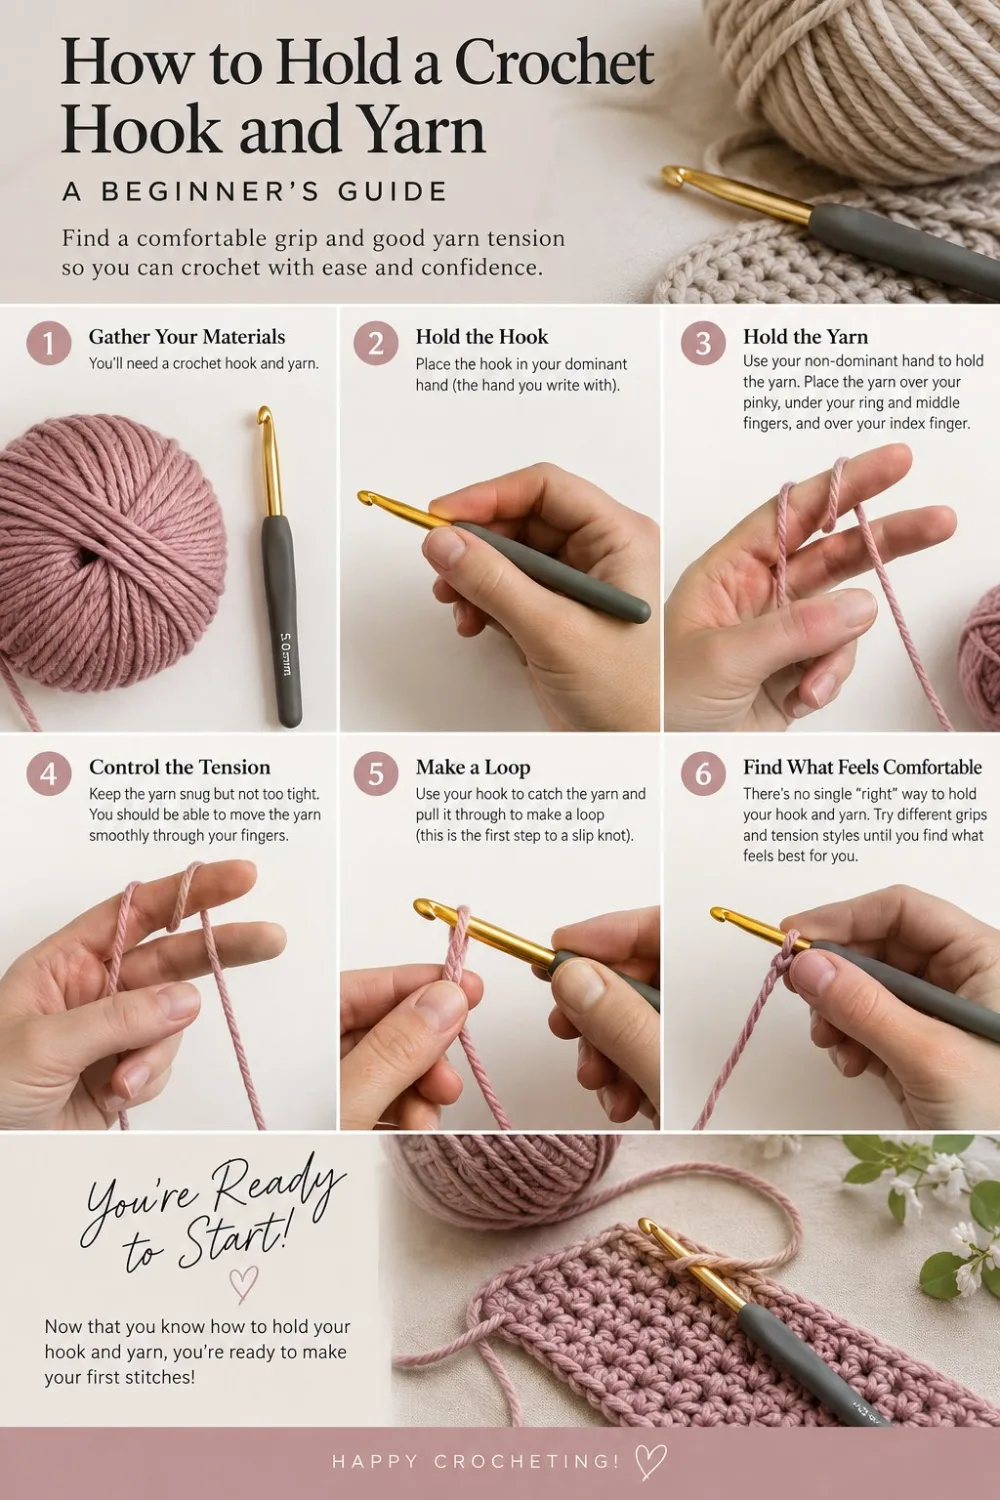
A 5.0mm or 5.5mm hook. Big enough to see what you’re doing, small enough to feel normal. If you can, get one with a soft handle — Clover Amour and Furls are the two most people land on. A bare aluminium Boye or Susan Bates hook works perfectly well and costs a fraction of that, but the thin metal shaft is harder on your hand while you’re still gripping too tight, which every beginner does.
Smooth, light-coloured worsted weight yarn. Worsted (also called aran, or weight #4) is the sweet spot. Light colours because you need to see your stitches, and dark yarn hides its own structure. Avoid anything fuzzy, fluffy, textured, or that shiny slippery acrylic — all three make tension harder for reasons that have nothing to do with your skill.
That’s it. Don’t buy a 12-piece hook set yet.
Cathrinee’s Supply Kit
The beginner basics I recommend
How to hold a crochet hook: pencil grip vs knife grip
Two grips. Try both properly before you decide, because most people default to whichever one they saw first and never test the other.
The pencil grip
Hold the hook the way you hold a pen — thumb and index finger on the flat thumb rest, hook resting in the crook between your thumb and hand, the shaft pointing back over your hand.
This one feels natural immediately if you write a lot, which is why beginners gravitate to it. It gives you fine control for detailed work and small stitches. The trade-off is that the motion comes almost entirely from your fingers and wrist, so it tires out faster on long projects, and it’s harder to push through dense stitchwork.
The knife grip
Hold the hook like you’re about to cut into a steak — palm over the top of the handle, thumb and index on the thumb rest, remaining fingers wrapped underneath, hook pointing forward.
The knife grip uses your whole arm and shoulder rather than just your fingers. It’s slower to feel natural but it’s noticeably kinder on your hands over a two-hour session, and it gives you real power when you’re working into tight stitches or stiff yarn like cotton. Most people who crochet a lot end up here, though plenty of fast, excellent crocheters use the pencil grip their whole lives.
Which one should you pick?
Try the pencil grip first, since it’ll feel less alien. Then force yourself to do twenty stitches with the knife grip before you judge it — the first ten will feel wrong and that means nothing.
Pick based on this: after fifteen minutes, which hand hurts less?
A note if you’re left-handed: hold the hook in your left hand, yarn in your right, and everything in this guide mirrors exactly. You’ll work your rows left to right instead of right to left. Ignore anyone who tells you to learn right-handed — that advice is decades out of date and only ever made things harder.
Holding the yarn: this is the part that actually matters
The hook hand does the obvious work. The yarn hand does the difficult work, and it’s where nearly all tension problems live.
Your yarn hand has one job: deliver yarn to the hook at a steady, consistent resistance. Not gripping, not free-flowing. Steady.
You do that by weaving the yarn through your fingers so friction does the work instead of your muscles. Here are three ways, from most to least common.
Method 1: the standard weave
Coming from the ball, run the yarn over your pinky, under your ring and middle fingers, and up over your index finger. Your index finger then lifts to feed yarn to the hook.
This is the one most tutorials show, and it’s a good default. The pinky wrap creates the drag; the index finger controls delivery.
Method 2: the pinky wrap
Same as above, but wrap the yarn fully around your pinky once before weaving it through. More friction, tighter tension.
Use this when your yarn is slippery — bamboo, silk blends, mercerised cotton, that shiny acrylic — or when your stitches are coming out loose and gappy.
Method 3: the minimalist
Yarn straight over your index finger, held loosely against your palm with your remaining fingers, no weaving at all.
Easiest to learn, hardest to keep consistent. Some experienced crocheters work this way happily. As a beginner you’ll probably find your tension drifts, but it’s worth knowing as a fallback if the standard weave feels impossible in your hand.
Your non-dominant hand also holds the work. Middle finger and thumb pinch the fabric just below the stitch you’re working into. This is doing more than it looks — it stops the piece twisting and keeps the working stitch open. Beginners forget this constantly and then wonder why the hook won’t go in.
Tension: too tight, too loose, and how to tell
Tension is just how much resistance the yarn meets on its way to the hook. It’s the single biggest difference between beginner-looking crochet and finished-looking crochet.
Signs your tension is too tight:
- You physically can’t fit the hook into the previous stitch
- Your fabric is stiff and curls at the edges
- Your hand aches after ten minutes
- The finished piece comes out smaller than the pattern says
Signs your tension is too loose:
- Big visible gaps between stitches
- The fabric is floppy and won’t hold shape
- Stitch edges look sloppy and hard to count
- The piece comes out larger than the pattern says
Too tight is far more common in beginners, and it comes from one thing: gripping. You are almost certainly squeezing the hook harder than necessary. Consciously loosen your hook hand and most of it resolves.
If loosening isn’t enough, go up a hook size. A 5.5mm instead of a 5.0mm. There’s no prize for using the hook the pattern names — patterns tell you to match gauge, not hook size, and going up a size is the standard fix for tight tension.
If your tension is too loose, add the pinky wrap, or go down a size.
A thing worth knowing early: your tension will be worse on your first two rows than anywhere else, forever. Working into a foundation chain is genuinely harder than working into stitches. Don’t judge your tension until row three.
Making your first loop
Once the grip feels okay, this is where it goes:
- Leave a tail about 15cm long.
- Make a slip knot — loop the yarn over itself, reach through the loop, pull the working yarn through, tighten gently onto the hook.
- Slide it onto the hook. Snug against the shaft, not strangling it. You should be able to slide it along.
- Yarn over — pass the working yarn over the hook from back to front.
- Pull it through the loop. That’s a chain stitch.
Repeat about twenty times and stop. Look at your chain. The stitches should be roughly the same size as each other — that’s the only thing you’re checking for right now, not whether they’re pretty.
[PHOTO 6 — your first chain, honestly. If it’s uneven, publish it uneven. Readers trust a wobbly real chain far more than a perfect one.]
When your hand hurts
Some hand fatigue in the first few weeks is normal — you’re using muscles in an unfamiliar pattern. Sharp pain, numbness, or tingling is not, and pushing through it is how people end up with repetitive strain problems.
What actually helps:
- Stop every 20–30 minutes. Set a timer if you get absorbed.
- Loosen your grip. Repeatedly. It creeps back tighter without you noticing.
- Switch grips mid-session. Pencil for a while, knife for a while, different muscles.
- Try an ergonomic hook. The soft wide handles genuinely reduce grip strain, and it’s the one piece of gear worth spending money on early.
- Stretch your hands and forearms before and after, not just after.
If pain persists past a session or two, or you’re getting numbness, that’s a doctor conversation rather than a crochet-technique one.
Common beginner mistakes
Copying a tutorial’s grip exactly. Their hands aren’t your hands. Use videos to understand the mechanics, then adapt.
Switching grips every five minutes. Test both properly, commit to one for a few weeks, then reassess. Constant switching means you never build the muscle memory that makes tension consistent.
Starting with the wrong yarn. Every fuzzy, dark, or slippery yarn multiplies the difficulty. Smooth light worsted, first project, no exceptions.
Giving up in week one. Grip and tension take roughly two to three weeks of regular short sessions to stop feeling awkward. That’s not a long time — it just feels long while you’re in it.
Once holding the hook feels natural, pick a first project from our list of crochet patterns for beginners.
FAQ
Is the pencil grip or knife grip better? Neither. The knife grip tends to be easier on your hands over long sessions because it uses your arm rather than your fingers; the pencil grip gives finer control on small detailed work. Choose whichever hurts less after fifteen minutes.
Why does my hand hurt when I crochet? Almost always because you’re gripping the hook too hard, which nearly every beginner does. Consciously loosen your grip, take a break every 20–30 minutes, and consider an ergonomic hook with a soft handle.
Do left-handed people hold a crochet hook differently? Same grips, mirrored. Hook in your left hand, yarn in your right, rows worked left to right. Look for left-handed tutorials rather than trying to reverse right-handed ones in your head.
How do I fix crochet tension that’s too tight? Loosen your hook hand first — that fixes it most of the time. If not, go up one hook size. Tight tension is the most common beginner issue and it resolves with practice.
How long does it take to get comfortable holding a crochet hook? Two to three weeks of short regular sessions for most people. Short and frequent beats one long session a week.
How should I hold a crochet hook?
There are two standard grips. The pencil hold has the hook resting between thumb and index finger like a pen. The knife hold has your palm over the top of the hook, like holding a knife. Neither is more correct — use whichever hurts less after twenty minutes.
Which crochet hook grip is better for beginners?
The knife hold suits most beginners because it puts less strain on the wrist and gives more control over thicker yarn. If your hand aches or cramps, switch grips before you assume crochet is not for you.
How do I hold the yarn when crocheting?
Wrap the working yarn around your little finger, run it across your palm and over your index finger. Your index finger controls the tension by holding the yarn slightly taut; the little finger provides the resistance.
Why does my hand hurt when I crochet?
Usually a grip that is too tight, or crocheting for too long without a break. Loosen your hold on the hook, go up a hook size, and stop every twenty minutes to stretch your hand. Pain is a signal to change something, not to push through.
Does it matter which hand I crochet with?
No. Left-handed crocheters work the mirror image of every instruction, and once learned it makes no difference to the finished piece. If you are left-handed, look for left-handed tutorials rather than trying to reverse right-handed ones in your head.