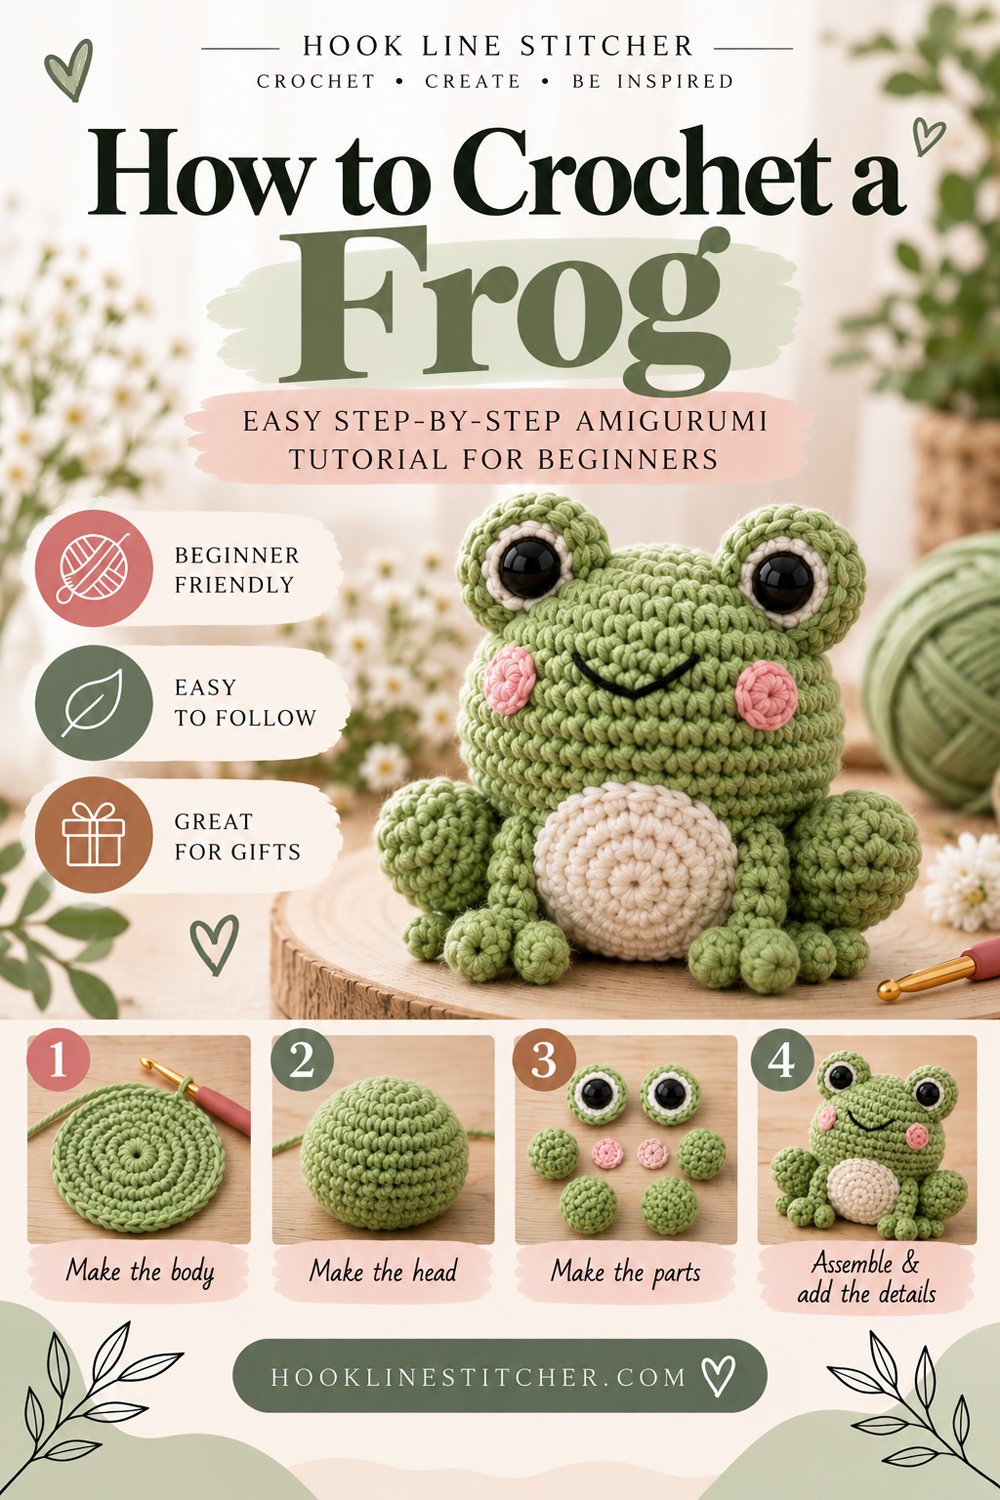
The crochet frog is the most-made amigurumi on the internet right now, and there is a good reason beyond the trend: the frog is the one animal where the body and head are a single piece. No neck join, no wobbly head, no stitching two spheres together and hoping. You make one ball, add eyes on top and legs at the bottom, and you have a frog.
That makes it an unusually good first amigurumi. If you have been putting off stuffed toys because assembly looked fiddly, start here.

From the shop · New pattern
A sweet cat-ear coaster in just 5 rounds. Beginner friendly, printable 7-page PDF for $4.99.
See the pattern →What you will need
| Item | What I recommend | Why |
|---|---|---|
| Yarn | Worsted weight (#4) in green, about 50 yards | Standard amigurumi weight |
| Yarn | Small amounts of white and black | For the eyes |
| Hook | 3.5 mm | Small for the yarn, so stuffing cannot show |
| Stuffing | Polyester fibrefill | Washable, holds shape |
| Stitch marker | Or scrap yarn | Non-negotiable for spiral rounds |
| Yarn needle | Blunt tapestry needle | Assembly |
The small hook is the thing beginners get wrong most often. Amigurumi wants a hook one or two sizes below what your yarn label recommends, because the fabric has to be dense enough to contain stuffing. If you can see white fibrefill through the stitches, that is the problem and the only fix is a smaller hook.
From the shop · New pattern
A sweet cat-ear coaster in just 5 rounds. Beginner friendly, printable 7-page PDF for $4.99.
See the pattern →Cathrinee’s Supply Kit
Everything you need for this project
Stitches you need to know
- Magic ring — an adjustable starting loop that closes completely, so there is no hole
- Single crochet (sc) — the whole frog, see how to crochet a single crochet stitch
- Increase (inc) — 2 sc into one stitch
- Invisible decrease (dec) — hook into the front loop only of the next two stitches, then yarn over and pull through both
How to crochet a frog step by step
The body and head in one
- Magic ring, 6 sc. Pull the ring tight closed. Put your marker in the first stitch and move it every single round from here on.
- Round 2: Increase in every stitch. 12 stitches.
- Round 3: (sc 1, inc) around. 18 stitches.
- Round 4: (sc 2, inc) around. 24 stitches.
- Rounds 5 to 10: Single crochet around, no increases. 24 stitches per round. This is the whole depth of the frog.
- Round 11: (sc 2, dec) around. 18 stitches.
- Round 12: (sc 1, dec) around. 12 stitches.
- Stuff firmly. Do it now, while the opening is still wide enough to reach into. Add the fibrefill in small pinches and press each one outward, working from the bottom up. A frog stuffed in one lump goes lopsided.
- Round 13: Decrease around. 6 stitches. Fasten off with a long tail, thread it through the remaining 6 loops and pull tight to close the base.
The eyes (make 2 of each piece)
- White part: Magic ring, 6 sc. Increase around to 12 stitches. Work one even round. Fasten off with a tail. Do not stuff — a light pinch of fibrefill at most.
- Black pupil: With black yarn, magic ring, 5 sc, fasten off leaving a tail. That is it, a tiny disc.
- Assemble each eye: Sew the black disc onto the white piece, slightly off centre and toward the inside. Placing both pupils toward the middle gives the frog that cross-eyed look everyone loves. Placing them centred gives a calmer frog. Your choice — try it both ways before you commit.
The legs
- Back legs (make 2, larger): Magic ring, 6 sc. Work 5 even rounds. Do not stuff. Flatten the opening and single crochet across to close. Leave a tail.
- Front legs (make 2, smaller): Magic ring, 6 sc. Work 3 even rounds. Flatten and single crochet across. Leave a tail.
- Optional toes. For each leg, before flattening, work three tiny bumps along the end: slip stitch, then (sc, hdc, sc) into one stitch, repeated three times. It adds about two minutes per leg and makes a real difference.
Assembly
- Attach the eyes high on the head. Sit them right on top, close together, so they rise above the body line. This is what makes it read as a frog rather than a green ball. Stitch all the way around the base of each eye so they stand up rather than flop.
- Attach the back legs low on the sides, angled outward and slightly forward, so the frog looks like it is crouching.
- Attach the front legs at the front, pointing down and slightly in. They should just touch the surface when the frog sits.
- Add the mouth. With black yarn, sew one long horizontal straight stitch across the front, below the eyes, curving very slightly upward at the ends. One stitch. Resist doing more.
- Weave in every end on the inside and trim close.
Troubleshooting
Stuffing is showing through. The hook is too big. Go down to 3.0 mm.
My frog is lopsided. Uneven stuffing, or increases not evenly spaced. Take the stuffing out and rebuild it in pinches. The full diagnosis is in why is my amigurumi lopsided, saggy, or showing stuffing.
There is a hole at the base of the magic ring. It was not pulled fully closed. Thread the starting tail, run it around the ring and cinch.
The eyes flop forward. You stitched only the bottom edge. Go all the way around the base of each eye, and pull each stitch snug.
I lost my place in the round. The marker has to move to the first stitch of every new round. Amigurumi is worked as a continuous spiral with no join, so without the marker there is nothing to count from. How to count crochet stitches covers reading your work.
My frog does not sit flat. The base closed too tightly and pulled into a point. Push down firmly on a table to flatten it, or redistribute stuffing away from the very bottom.
Variations to try
- Bucket-hat frog. Make a small flat circle, add a short brim round, and perch it between the eyes. This is the version that went everywhere.
- Keychain frog. Sport weight yarn with a 2.5 mm hook gives a frog about 2 inches tall. Add a slip-stitch loop and a keyring.
- Colour variations. Yellow, blue and pink frogs are all popular and none of them look wrong.
- Sitting on a lily pad. Work a flat green circle of 5 rounds, snip a small wedge out of the edge and sew it closed for the notch.
- Frog family. Make one at 24 stitches wide, one at 18, one at 12. They photograph beautifully as a set.
Why the frog is a good teacher
The frog teaches you the three motions that every amigurumi uses — increase to widen, work even for depth, decrease to close — without asking you to join two pieces at a neck, which is where most first attempts go wrong. Once you have made this, a bunny, a cat or a turtle will feel like the same project with different ears.
If this is for a small child, embroider the eyes directly onto the body in black and white yarn instead of making separate eye pieces, and avoid safety eyes and buttons entirely.
More animals at this level are collected in easy amigurumi patterns for beginners.
Not sure what weight your yarn is? The Craft Yarn Council yarn weight system will tell you, and for amigurumi you then go one or two hook sizes smaller.
Why is a crochet frog good for beginners?
Because the head and body are a single piece. Most amigurumi animals require you to make two spheres and join them at the neck, which is where first attempts usually go wrong. A frog has no neck join — you make one ball, add eyes on top and legs below.
What hook size should I use for a crochet frog?
A 3.5 mm hook with worsted weight yarn, which is one to two sizes smaller than the yarn label suggests. Amigurumi needs a dense fabric so the stuffing cannot poke through. If you see white fibrefill between stitches, drop to 3.0 mm.
How do I make the frog eyes stand up instead of flopping?
Stitch all the way around the base of each eye rather than just along the bottom edge, and pull every stitch snug. Position them high on the head so they rise above the body line — that placement is what makes the shape read as a frog.
Should the frog pupils be centred or cross-eyed?
Both work. Placing each black pupil off centre and toward the inside gives the cross-eyed look that made this design popular. Centred pupils give a calmer frog. Pin them in place and look at it from a distance before you sew.
How big is this crochet frog?
About 4 inches tall using worsted weight yarn and a 3.5 mm hook. For a keychain-sized frog of roughly 2 inches, use sport weight yarn with a 2.5 mm hook and follow exactly the same rounds.