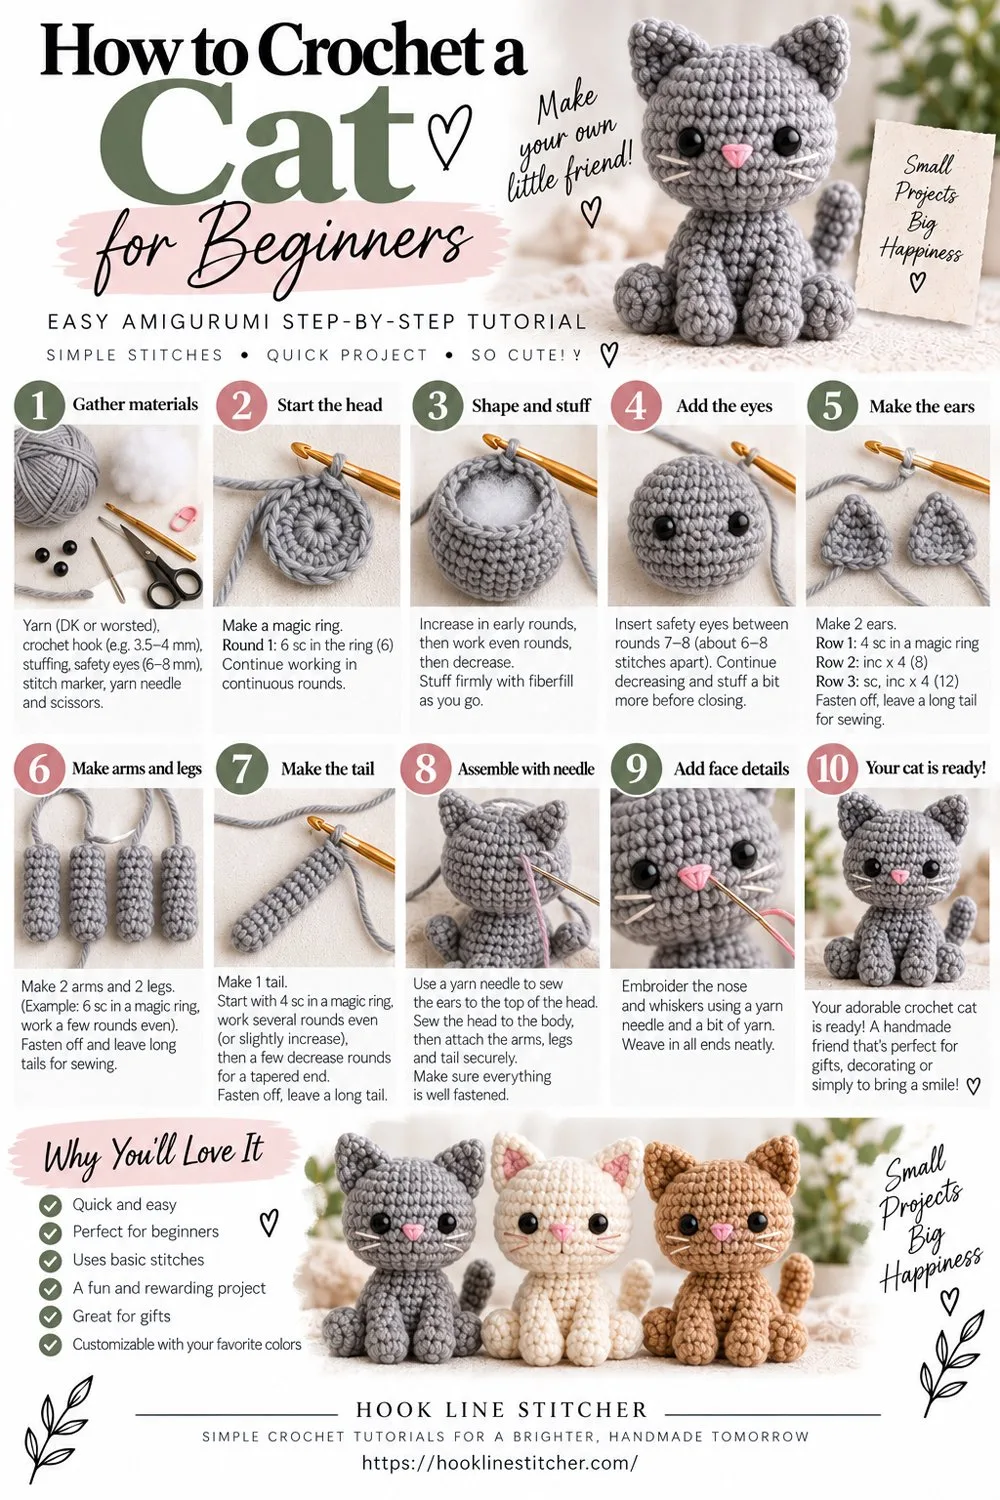
Cats are the easiest animal in amigurumi, and the reason is the ears. That is what makes how to crochet a cat a genuinely first-time amigurumi project.
- Skill level: Beginner amigurumi
- Time: 2–3 hours
- Yarn: Worsted (4) or DK (3)
- Hook: 3.5mm for worsted, 3.0mm for DK
- Finished size: About 15 cm tall
- Terms: US crochet terms
A bunny needs two long ears that have to match each other and sit at the same angle, or the whole thing looks off. A bear needs curved ears that are fiddly to shape. A cat needs two small triangles. They are quick, they are forgiving, and a slight difference between them reads as character rather than error.
Everything else here is the standard amigurumi shape — a ball for the head, a slightly smaller ball for the body, worked as one continuous piece so there is no neck seam to line up. That removes the part of amigurumi where beginners most often come unstuck.
Two to three hours for a first attempt. Finished cat sits about 15 cm tall.

From the shop · New pattern
A sweet cat-ear coaster in just 5 rounds. Beginner friendly, printable 7-page PDF for $4.99.
See the pattern →What you need to know first
- Single crochet — essentially the only stitch used
- The magic ring
- Working in a continuous spiral
- Increasing and decreasing
If you can single crochet and you have managed a magic ring, you can make this.
What you need
This post contains affiliate links. As an Amazon Associate I earn from qualifying purchases, at no extra cost to you. Full disclosure.
Worsted weight (4) or DK (3) yarn. Grey, black, orange, or cream all read as cat immediately. Cotton gives crisper stitch definition; acrylic is softer to work with. Avoid anything fluffy — you need to see your stitches to count them.
A hook one or two sizes smaller than the label says. A 3.5mm for worsted, 3.0mm for DK. The fabric has to be tight enough that stuffing does not show through. This is not negotiable in amigurumi.
A stitch marker. Essential, not optional — there is no seam in a spiral to tell you where a round begins.
A tapestry needle.
For the face: black and pink yarn or embroidery floss. If the cat is for a child under three, embroider the eyes — do not use safety eyes or beads. They are a choking hazard regardless of the packaging.
From the shop · New pattern
A sweet cat-ear coaster in just 5 rounds. Beginner friendly, printable 7-page PDF for $4.99.
See the pattern →Cathrinee’s Supply Kit
Everything you need for this project
Terms
US crochet terms throughout.
- MR = magic ring
- sc = single crochet
- inc = 2 sc into the same stitch
- dec = decrease, 2 stitches worked together
- ( ) x6 = repeat the bracket six times
- The number in bold at the end of each round is your stitch count
Use the invisible decrease: insert your hook into the front loop only of the next stitch, then the front loop only of the one after, then yarn over and pull through two, yarn over and pull through two. It disappears into the fabric where a standard decrease leaves a bump. On a cat face, that is worth the extra thirty seconds of learning.
How to crochet a cat, round by round
Head and body (one piece)
Start at the top of the head.
- R1: 6 sc in MR — (6)
- R2: inc in each st — (12)
- R3: (sc, inc) x6 — (18)
- R4: (2 sc, inc) x6 — (24)
- R5: (3 sc, inc) x6 — (30)
- R6–R11: sc in each st around, six rounds — (30)
- R12: (3 sc, dec) x6 — (24)
- R13: (2 sc, dec) x6 — (18)
Stuff the head firmly now. Firmer than feels reasonable. Push stuffing up into the crown with the back of your hook. Under-stuffing is the most common amigurumi mistake and it makes the head sag within days.
- R14: (sc, dec) x6 — (12)
- R15: sc in each st around — (12) (this is the neck)
- R16: (sc, inc) x6 — (18)
- R17: (2 sc, inc) x6 — (24)
- R18–R23: sc in each st around, six rounds — (24)
- R24: (2 sc, dec) x6 — (18)
- R25: (sc, dec) x6 — (12)
Stuff the body firmly, pushing extra into the neck. Do this before the opening gets too small to work through.
- R26: dec x6 — (6)
Fasten off with a 20 cm tail. Thread it on your needle, run it through the front loop of each of the 6 remaining stitches, and pull tight to close like a drawstring. Push the needle out through the body somewhere else, pull, snip, and the end disappears inside.
Ears (make 2)
Worked flat, in rows, not in the round.
- Ch 7
- R1: sc in the 2nd ch from hook and in each ch across — (6)
- R2: ch 1, turn, dec, sc in next 2, dec — (4)
- R3: ch 1, turn, dec, dec — (2)
- R4: ch 1, turn, dec — (1)
Fasten off, leaving a 30 cm tail for sewing. You should have a small triangle. Do not stuff it.
Tail
- R1: 6 sc in MR — (6)
- R2–R12: sc in each st around — (6)
Fasten off with a long tail. Stuff very lightly or leave it empty — an unstuffed tail drapes, a stuffed one sticks out. Both look fine, so pick the cat you want.
Optional: front paws (make 2)
- R1: 6 sc in MR — (6)
- R2–R5: sc in each st around — (6)
Fasten off with a long tail. Flatten and sew to the front of the body around round 18. The cat works perfectly well without them.
There are no back legs. The cat sits on the base of its body, which is both simpler and more cat-like.
Assembly
Ears. Position each triangle across rounds 3 to 5 of the head — high up, not on the sides. Space them about 8 stitches apart. Sew along both bottom edges of the triangle so the ear stands up rather than flopping.
Before sewing the second one, look at the first from directly in front. Ears set slightly wider apart and angled outward read alert and friendly. Close together and upright reads a bit severe. Move it now, while it is easy.
Tail. Sew to the centre back around round 23, low on the body.
Face. Eyes between rounds 8 and 9, about 7 stitches apart. Come up from inside the head, make three or four small vertical stitches for each eye, and go back in.
Add a small pink triangle nose centred between and one round below the eyes, then two short diagonal lines from the base of the nose for the mouth.
Keep the eyes wide-set and low. This is the single biggest factor in whether a finished amigurumi looks cute or unsettling, and instinct pulls you toward placing them too high and too close. Pin scrap yarn in position and look at it before committing.
Whiskers are optional. If the cat is for a small child, leave them off — loose strands are a hazard and they pull out.
Troubleshooting
Stuffing is visible through the fabric. Gauge is too loose. Go down a hook size and start over — there is no fixing it afterwards.
The head sags. Under-stuffed, usually in the neck. The neck carries all the head weight and it is the easiest part to skimp on.
I lost my place in the spiral. Count the current round and compare to the pattern to find where you are. If nothing matches, pull back to a round you can identify. This is what the stitch marker prevents.
My stitch count is off by one. Almost always a missed or doubled increase. Count at the end of every round — small errors compound fast.
The ears flop over. Not sewn along both bottom edges. Sew the full base, not just the corners.
The cat looks wrong and I cannot say why. It is the face. Nine times out of ten it is eye placement — too high, too close, or both. Unpick and move them. Everyone does this.
Variations
- Tabby stripes. Embroider a few straight stitches across the head and back in a darker shade.
- White paws and chest. Change colour for the last few rounds of the paws, and embroider a patch on the chest.
- Sleeping cat. Embroider closed eyes as two small curved lines instead of dots. Much easier than open eyes and reliably charming.
- Bigger cat. Same pattern in chunky yarn with a 5.0mm hook gives roughly double the size.
- A collar. Chain a length of contrasting yarn, tie it around round 15, and add a tiny button.
What is next
Nearly every small amigurumi animal is a variation of this shape: magic ring, increase out, work straight, decrease in, stuff, close. A bunny is this pattern with long flat ears. A bear is this pattern with small round ones.
If you want something shorter before the next big project, a crochet heart or a flower keychain is a single-sitting build.
Frequently asked questions
How long does it take to crochet a cat? Two to three hours for a first attempt including assembly, around ninety minutes once amigurumi feels familiar.
What hook size should I use for amigurumi? One or two sizes smaller than the yarn label recommends — 3.5mm for worsted, 3.0mm for DK. The tight gauge is what stops stuffing showing through.
Why can I see stuffing through my amigurumi? Gauge too loose. It cannot be corrected after the fact, which is why the smaller hook matters so much.
Are safety eyes safe for babies? Not reliably. For any toy going to a child under three, embroider the eyes instead. It removes the risk completely.
How firmly should amigurumi be stuffed? Firmer than feels natural. It should hold its shape when squeezed and spring back.
Why does my amigurumi look lopsided? A stitch count that drifted during the increase rounds. Counting every round is the only real defence.
Can I sell cats made from this pattern? Yes, sell the finished toys freely. Please do not republish the pattern text itself.
How do you crochet a cat?
Work a head and body as two spheres in the round, two triangular ears, four small limbs and a tail. Stuff the head and body firmly, join them, then attach the ears, limbs and tail and embroider the face.
How do I stop my crochet cat head wobbling?
Stitch around the head-to-body join twice with the long tail, pulling each stitch snug. A single pass never supports the weight of a stuffed head, and the wobble appears within days.
How do I make the cat ears?
Work small triangles by starting with a few stitches and decreasing each row to a point, or work a flat half-circle. Leave them unstuffed and sew them flat to the top of the head, angled slightly outward.
What hook size for a crochet cat?
A 3.5 mm hook with worsted weight yarn — smaller than the label suggests, so the fabric is dense enough to hide the stuffing. If white fibrefill shows through, drop to 3.0 mm.
How do I give my crochet cat a good face?
Keep it minimal. Two small straight stitches for eyes spaced about four stitches apart, a tiny triangle nose, and three thin whiskers each side. Eye placement decides the whole expression, so pin before you sew.



2 Comments on “How to Crochet a Cat for Beginners: Easy Amigurumi Step-by-Step Tutorial”