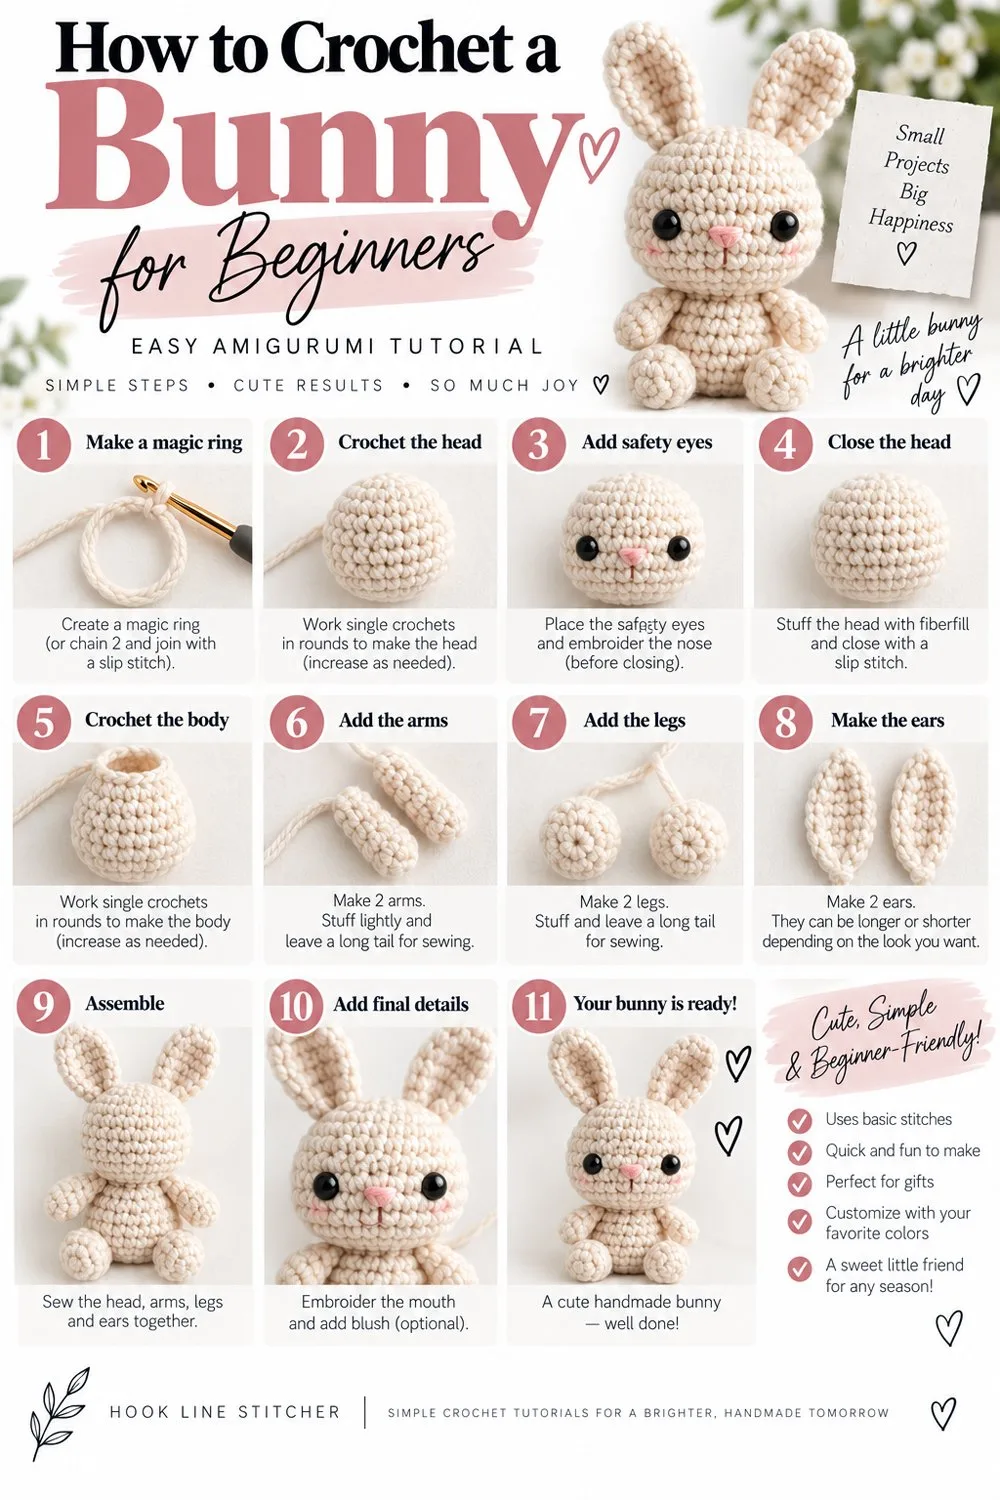
Most beginner amigurumi patterns are not actually beginner patterns. This one is, and it shows you how to crochet a bunny in a single piece, with no separate head to sew on.
- Skill level: Beginner amigurumi
- Time: 2–3 hours
- Yarn: Worsted (4) or DK (3)
- Hook: 3.5mm for worsted, 3.0mm for DK
- Finished size: About 15 cm tall
- Terms: US crochet terms
They give you a head, a body, two arms, two legs, two ears and a tail, and then say “sew together” as though that’s the easy part. It isn’t. Assembly is where first amigurumi projects go wrong — pieces end up crooked, necks wobble, and something that looked adorable in the photo comes out looking slightly haunted.
This bunny avoids most of that. The head and body are worked as one continuous piece, so there’s no neck seam and nothing to line up. You sew on two ears and a tail. That’s the entire assembly.
It takes two to three hours for a first attempt, and the finished bunny is about 15 cm tall.

From the shop · New pattern
A sweet cat-ear coaster in just 5 rounds. Beginner friendly, printable 7-page PDF for $4.99.
See the pattern →What you need to know first
Amigurumi uses very few stitches, but it uses them in ways that are unfamiliar. You’ll want to be comfortable with:
- single crochet — this is essentially the only stitch in the whole pattern
- The magic ring
- Working in the round, specifically in a continuous spiral
- Increasing and decreasing
- Weaving in ends
If single crochet is solid and the magic ring is manageable, you can do this. The rest of the difficulty is patience, not technique.
What you need
Yarn: worsted weight (4) or DK (3). Cotton gives crisper stitch definition and holds shape better; acrylic is softer and more forgiving to work with. Either works. Avoid anything fluffy — fluff hides your stitches, and in amigurumi you need to count constantly.
A hook one or two sizes smaller than the yarn recommends. A 3.5mm for worsted, or 3.0mm for DK. This is not optional in amigurumi. The fabric must be dense enough that stuffing doesn’t show through the gaps, and the standard hook size for your yarn will always be too loose.
Polyester toy stuffing.
A stitch marker. Genuinely essential here, not a suggestion. More on that below.
A tapestry needle.
For the face: either 6mm safety eyes, or black yarn or embroidery floss.
Safety note: if this bunny is for a child under three, or for a baby, embroider the eyes with yarn. Safety eyes and beads are a choking hazard regardless of what the packaging says about being “safe.” Embroidered eyes look just as good and remove the risk entirely.
From the shop · New pattern
A sweet cat-ear coaster in just 5 rounds. Beginner friendly, printable 7-page PDF for $4.99.
See the pattern →Cathrinee’s Supply Kit
Everything you need for this project
Amigurumi terms you’ll see
This pattern uses US crochet terms.
- MR = magic ring
- sc = single crochet
- inc = increase — work 2 sc into the same stitch
- dec = decrease — work 2 stitches together into one
- st(s) = stitch(es)
- ( ) x6 = repeat what’s in the brackets six times
- The number in brackets at the end of each round is your stitch count after that round
About the decrease
Use the invisible decrease rather than the standard one. Insert your hook into the front loop only of the next stitch, then the front loop only of the following stitch — three loops on your hook — then yarn over and pull through the first two, yarn over and pull through the remaining two.
It takes a minute to learn and it makes a visible difference. The standard decrease leaves a small bump; the invisible decrease disappears into the fabric. On a bunny’s face, that matters.
About working in a spiral
Amigurumi is worked in a continuous spiral — you never join rounds and you never chain to turn. You simply keep going around and around.
This is why the stitch marker is essential. There’s no seam to tell you where a round started. Place your marker in the first stitch of each round and move it up as you begin the next one. Lose track and you will not be able to work out where you are, and there’s no recovering it except by pulling back.
Every experienced amigurumi maker uses a marker. This is not a beginner crutch.
How to crochet a bunny, round by round
Head and body (one piece)
Start at the top of the head.
- R1: 6 sc in a magic ring (6)
- R2: inc in each st around (12)
- R3: (sc, inc) x6 (18)
- R4: (2 sc, inc) x6 (24)
- R5: (3 sc, inc) x6 (30)
- R6–R11: sc in each st around — six rounds with no shaping (30)
This is where you attach safety eyes if you’re using them. Place them between rounds 8 and 9, roughly 6 stitches apart. Do it now — once the head is stuffed you can’t reach the back of the fabric.
- R12: (3 sc, dec) x6 (24)
- R13: (2 sc, dec) x6 (18)
Stuff the head firmly now. Firmer than feels right. Under-stuffing is the most common amigurumi mistake and it makes the head sag once it’s finished. Push stuffing into the top of the head with the back of your hook. The fabric should feel solid, and you shouldn’t be able to see stuffing through the stitches — if you can, your gauge is too loose.
- R14: (sc, dec) x6 (12)
- R15: sc in each st around (12) — this is the neck
Now the body begins:
- R16: (sc, inc) x6 (18)
- R17: (2 sc, inc) x6 (24)
- R18–R23: sc in each st around — six rounds (24)
- R24: (2 sc, dec) x6 (18)
- R25: (sc, dec) x6 (12)
Stuff the body firmly, adding a little more into the neck as you go. Top up before the opening gets too small — around round 26 it becomes fiddly.
- R26: dec x6 (6)
Fasten off, leaving a 20 cm tail. Thread it onto your tapestry needle and run it through the front loop of each of the remaining 6 stitches, then pull tight to close the hole like a drawstring. Push the needle through the body and out somewhere else, pull, and snip. The end disappears inside.
Ears (make 2)
- R1: 6 sc in a magic ring (6)
- R2: (sc, inc) x3 (9)
- R3: sc in each st around (9)
- R4: (2 sc, inc) x3 (12)
- R5–R10: sc in each st around — six rounds (12)
Fasten off leaving a long tail, about 30 cm, for sewing.
Do not stuff the ears. Flatten each one with your fingers. Bunny ears should be flat — stuffed ones look like horns.
Tail
- R1: 6 sc in a magic ring (6)
- R2: inc in each st around (12)
- R3–R4: sc in each st around (12)
- R5: dec x6 (6)
Stuff lightly and close as you did the body. Leave a tail for sewing.
Easier alternative: make a small pom-pom instead. It looks fluffier and more bunny-like, and it takes two minutes.
Optional: arms (make 2)
The bunny works fine without arms, and leaving them off makes this a much gentler first project. If you want them:
- R1: 6 sc in a magic ring (6)
- R2–R6: sc in each st around (6)
Fasten off with a long tail. Stuff very lightly or not at all. Flatten and sew to the sides of the body around round 17.
There are no legs in this pattern. The bunny sits on the base of its body, which is a deliberate choice — legs are where beginner amigurumi most often ends up lopsided.
Assembly
Ears. Flatten each ear and pin or hold it against the head, positioned across rounds 3 to 5 — near the top, not on the sides. Space them about 6 stitches apart. Sew through the flattened base of the ear and into the head, going back and forth several times so it holds firmly.
Before you sew the second one, step back and look at the first from directly in front. Ear placement is what gives an amigurumi its expression, and it’s much easier to move an unsewn ear than an attached one. Slightly forward-facing reads friendly. Wide and low reads sleepy.
Tail. Sew to the centre back of the body, around round 22.
Face. If you’re embroidering rather than using safety eyes, place the eyes between rounds 8 and 9, about 6 stitches apart. Come up from inside, make a few small vertical stitches for each eye, and go back in. Add a small triangular nose in pink or black between the eyes, one round lower.
Keep the eyes further apart and lower on the face than instinct suggests. Wide-set, low eyes read as cute. Close-set, high eyes read as unsettling. This is the single biggest lever on how the finished bunny looks, and it’s worth using pins to test placement before you commit.
Troubleshooting
I can see the stuffing through the fabric. Gauge is too loose. Go down a hook size and start again — there’s no fixing this after the fact, unfortunately. It’s the reason amigurumi always uses a smaller hook than the yarn suggests.
My bunny’s head is sagging. Under-stuffed, or under-stuffed in the neck specifically. The neck carries all the weight of the head, and it’s the easiest part to skip because it’s narrow and awkward.
I lost my place in the spiral. It happens. Count your stitches around the current round and compare against the pattern to work out where you are. If the count doesn’t match anything, pull back to a round you can identify. This is why the marker matters.
My stitch count is off by one or two. Almost always a missed increase or a doubled one. Small errors compound — being two stitches over at round 5 becomes a visibly wonky head by round 11. Count at the end of every single round. It’s tedious and it’s the whole job.
There’s a hole in my magic ring. Pull the tail tighter. If it’s already fastened off, use the tail and your needle to stitch it closed from the inside.
My rounds are spiralling visibly / there’s a seam line. That’s normal in spiral amigurumi. The slight diagonal line is inherent to the technique. Turn it to the back before you sew on the tail.
The ears look wrong. Nine times out of ten it’s placement, not the ears. Unpick and move them. Everyone does this.
Making it your own
- Colour. Grey, cream, and soft brown read as realistic. Pink, mint, and lavender read as toy.
- A contrasting inner ear. Work rounds 1–3 of each ear in pink, then switch.
- A scarf or bow around the neck at round 15 — the narrowest point, and it hides any neck untidiness.
- Size. Same pattern in chunky yarn with a 5.0mm hook gives a bunny roughly twice the size. No maths needed.
- A longer body. Add two or three plain rounds between R18 and R23 for a taller, slimmer bunny.
What’s next
Amigurumi is mostly this same set of moves — magic ring, increase out, work straight, decrease in, stuff, close. Once you’ve made one bunny, most small animals are a variation on it. A bear is this pattern with round ears and a shorter muzzle. A cat is this pattern with triangular ears.
If you want something shorter before the next big one, a crochet flower keychain or a crochet heart are both single-sitting projects that use the magic ring again.
Frequently asked questions
How long does it take to crochet a bunny?
Two to three hours for a first attempt, including assembly. Around ninety minutes once you’re comfortable with amigurumi.
What size hook should I use for amigurumi?
One or two sizes smaller than the yarn label recommends — a 3.5mm for worsted weight, 3.0mm for DK. The tight gauge stops stuffing showing through the stitches.
Is amigurumi good for beginners?
Yes, as long as you can single crochet and work in the round. It uses almost no stitch variety. The difficulty is counting and consistency, not technique.
Why can I see the stuffing through my amigurumi?
Your gauge is too loose. Go down a hook size. This can’t be fixed after the piece is made.
Are safety eyes safe for babies?
Not reliably. For any toy going to a child under three, embroider the eyes with yarn instead. It removes the choking risk completely and looks just as good.
How firmly should I stuff amigurumi?
Firmer than feels natural. The piece should hold its shape when squeezed and spring back. Soft, squashy amigurumi sags within days.
Why is my amigurumi lopsided?
Usually a stitch count that drifted somewhere in the increase rounds. Count at the end of every round — it’s the only real defence.
Can I sell bunnies I make from this pattern?
Yes, sell the finished toys freely. Please don’t republish the pattern text itself.
You are welcome to sell items you make from this pattern. Please do not republish the pattern text — link to this page instead. Pattern © The Hook Line Stitcher.
How do you crochet a bunny?
Work a head and body in the round, two long flat ears, four small limbs and a small round tail. Stuff the head and body, join them securely, then sew on the ears, limbs and tail and embroider the face.
How do I make crochet bunny ears stand up?
Work them slightly denser and do not stuff them, then sew the base firmly across its whole width rather than just at the tip. For ears that stand fully upright, fold the base in half before sewing so it forms a stiffer joint.
What hook and yarn for a crochet bunny?
Worsted weight yarn with a 3.5 mm hook. Cream, white, grey or soft pink all work well. The small hook keeps the fabric dense so stuffing cannot show through.
How do I make the bunny tail?
Work a small ball of six to twelve stitches, stuff it very lightly, and sew it to the lower back. For a fluffier tail, make a small pompom instead and stitch it on securely.
Is a crochet bunny safe for a baby?
Yes if you embroider the eyes and nose in yarn rather than using safety eyes, sew every piece on twice, and use machine washable yarn and stuffing. Avoid pompoms for children under three.



2 Comments on “How to Crochet a Bunny for Beginners: Easy Amigurumi Step-by-Step Tutorial”